
Drupal is one of the most popular CMSs used by a large group of individuals and communities of users for publishing, managing, and organizing different type of content on the website. However, as Drupal used to be installed on Linux platform with Apache server, many people miss the fact that it also can be deployed successfully in Windows with IIS web server.
This article provides step by step instructions to getting Drupal installed and running on a Windows platform using Microsoft Web Platform Installer.
Install Drupal for Windows with Microsoft Web Platform Installer
Using Microsoft Web Platform Installer, i.e. Web Pl, is the quickest as well as the easiest way to have Drupal successfully installed on a Windows platform.
What is Microsoft Web Platform Installer?
The Microsoft Web Platform Installer is a free tool which is designed to get the latest components of the Microsoft Web Platform downloaded, installed and kept up to date. The currently available components include IIS, Microsoft SQL Server Express, Visual Web Developer, and Microsoft .NET Framework Microsoft WebMatrix, PHP and etc.
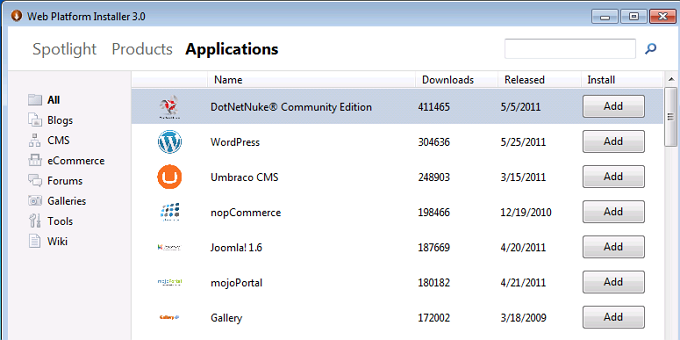
In addition, it comes with the functionality of installing web applications for Windows, such as Drupal, WordPress, Joomla, nopCommerce, Incentive, DNN Platform, Umbraco CMS and more. All these popular applications can be found at the Windows Web App Gallery, which is an interface of Microsoft Web Platform Installer and is accessible from anywhere via visiting the official website of the Microsoft Web Platform.
Prerequisites
System requirements for Microsoft Web Platform Installer contain an Internet connection and one of the following supported OS:
- Windows Server 7;
- Windows XP SP3;
- Windows Vista SP2;
- Windows Server 2008 or Windows Server 2008 R2;
- Windows Server 2003 SP2.
The following installation guide is written based on Windows Server 2008 R2 operating system.
Installation of Drupal on Windows
Step1: Go to https://www.microsoft.com/web/downloads/platform.aspx and download Web Platform Installer to your local computer, and then run it.
Step2: Opens the Web Applications tab, select the Acquia Drupal to add it.
Step3: Add the database, name the SQL Server Express database, and name the Drupal site.
Step4: Verify the installation and add additional language as needed.
Step5: Enable clean URLs now that the Drupal installation has been completed.
By default, when a user selects the application of Acquia Drupal, the Web Platform Installer will install the prerequisite Windows components, PHP, and other components to run it.
Advanced Installation
Just as we’ve mentioned above, Drupal can be used with IIS web server. To install Drupal on IIS, people should ensure to have the FastCGI extension on IIS 7 and the later version on Windows operating system.
Preparation
Before installation, people need modify some lines for configuration of php.ini as follows:
- Give a definition of the extention_dir as d:\php\ext or other location of the PHP extentions directory.
- Enable MySQL support by uncommenting extension=php_mysql.dll, which is located in the extension list.
Application Unpacking
When downloading the latest version of Drupal, you had better compress and copy Drupal files to the location as c:\inetpub\wwwroot\drupal. Now you can create Settings.php, the configuration file which will be used to store important confirmation settings by Drupal. The next step is to give an assignment to write permissions using some commands:
- Make a copy file of .\sites\default\default.settings.php under the directory of .\sites\default\settings.php.
- Grant the permissions of “write” to the file

- When completing the installation, check to make sure the file permissions have been set back to “read only”.
- Create a certain folder as follows.

- Grant the permissions of “modify” to the folder:

Database Setup
Creating a database on your web server is very necessary before stating the installation procedure.
Firstly, run the installation script. To do it, you need go to http://localhost/drupal, and click Install Drupal in English. When entering the configuration page of database, type the following information:
Then enter your site name and site email address step by step on the configure site page.
Clean URLs Enabling
IIS 7 has URL rewriting support, which can be done by using the URL Rewrite Module. The following guide describes how to use the module for enabling clean URLs in Drupal.
The first step is to open the Web.config file from your local Drupal folder.
The second step is to copy and paste XML code as the picture shows into this file.
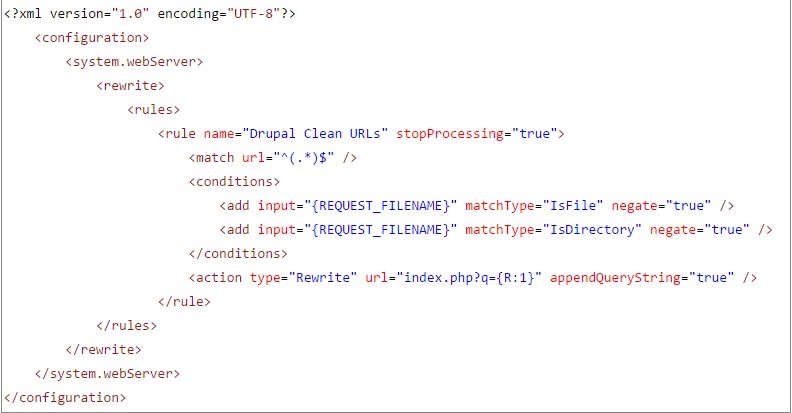
Save the file of web.config.
The third step is to open your web browser, and visit http://localhost.drupal/index.php?q=admin/settings/clean-up. Select to enable clean URLs instead of disabling it under Clean URLs page, and then click the button of Save configuration.
Summary
For people who are tired of building complex ASP.NET website and looking to benefiting from Drupal’s user-friendly installation, high performance, and good security, the Microsoft Web Platform Installer makes it possible for them to have a Drupal site on a Windows platform without changing to a Linux based hosting solution. Besides Drupal, other applications as WordPress can also run with a Windows hosting environment. Hosting your Drupal or WordPress site with the best SEO Windows web hosting like ASPHostPortal, HostForLIFEASP.NET, or UKWindowsHostASP.NET could be a more effective solution to improve SEO rankings of your site.