
How to Know if You’re Using SSD or HDD Parts in Windows
Compared to the regular mechanical hard drives (HDDs), Solid State Drives (SSDs) are very much faster and more efficient. As such, SSDs are highly preferred as a Windows installation drive to significantly improve Windows boot time and application launch time.
If you have recently bought a laptop or a pre-built desktop computer and are not sure if your system has an SSD in it, you can use built-in Windows tools to verify that. You don’t have to physically open the system. Here are a few different ways to find out if your system has an SSD, HDD or both in Windows 10.
1. Use Defragment and Optimize Drive Tool
The Defragmentation tool in Windows 10 is generally used to defragment fragmented drives. As part of that, the Defragment tool gives quite a bit of information about all the physical disks on your system. We can use that information to find out if you have an SDD or not.
1. First, search for “Defragment and Optimize Drive” in the Start menu and open it.
2. As soon as the defragment tool has been opened, you will see all your partitions on the main screen. If you look at the “Media Type” section, you can see what type of hard drive you have. If you have an SSD, the tool will list it as “Solid state drive.” If you have a regular mechanical hard drive, it will list it as “Hard disk drive.”

In my case, since I have two disks, SSD for Windows installation and HDD for regular storage, the Defragment tool is showing both drives.
Once you’ve found out if you have an SSD or not, simply close the window. Don’t worry about fragmentation. Windows will automatically defragment your drives either weekly or monthly.
2. Use PowerShell
If you don’t mind the command-line user interface, you can do pretty much anything on Windows using PowerShell. In fact, all it takes is one command to find out if you have an SSD, HDD, or both.
1. To get the hard disk details, you need to open the PowerShell as an administrator. To do that, search for “PowerShell” in the Start menu, right-click on the result and select the “Run as Administrator” option.
2. In the PowerShell window type Get-PhysicalDisk and press Enter to execute the command. This command will scan and list all the hard drives on your system with a variety of useful information like serial number, health status, size, etc., regarding each physical drive.
3. Just like with the Defragment tool, if you look under the “Media Type” section, you can see your hard disk type. If you have an SSD, the media type will list it as an SSD.

3. Use Speccy (third-party software)
Speccy is a simple, free third-party tool that shows a mountain of information regarding all your system hardware like CPU, hard disks, motherboard, peripherals, network cards, etc.
1. Go ahead and download Speccy from its official website. Once downloaded, install and open Speccy using the desktop keyboard shortcut or the start menu entry.
2. After opening Speccy, select “Storage” on the left panel. On the right panel Speccy will list all your hard drives. If there is an SSD in your system, Speccy will add an “(SSD)” tag next to the hard drive name. As you can see from the below image, my SSD has the SSD tag and HDD has no tag.

How to Know if You’re Using SSD or HDD Parts in Windows
Gamers running powerful PCs, system administrators taking care of giant servers and people who are working with sealed mobile devices all have a tendency to run into the same issue. It’s easy to forget whether you’re using SSD or HDD parts. Disks largely come in two forms today, and solid-state drives have a tendency to lie about the underlying hardware in order to make sure that they can stay compatible with your operating system no matter what. As a result, it’s hard to tell if you have an electromechanical hard disk or a solid-state one.
Linux users can easily tell whether they have SSD or HDD components in their computer. You’ll need to open up a terminal window for this to work. KDE, LXDE, Cinnamon and MATE users can click on the Applications menu, then click on Terminal under system tools. The same goes for Xfce4 users with Whisker menu installed. Ubuntu Unity users will want to search for Terminal on the Dash, and pretty much everyone can hold down Ctrl, Alt and T to start one up.
Method 1: Using lsblk to Distinguish Between SSD and HDD Volumes
Since you won’t actually be changing anything, you’re not going to need root access for the following command. Simply type lsblk -o name,rota at the prompt and push the return key. You’ll receive a short chart that lists the various devices you have attached to your computer as well as the partitions cut on them. If there is a number 1 in the ROTA column, then the disk is a rotation electromagnetic hard drive.
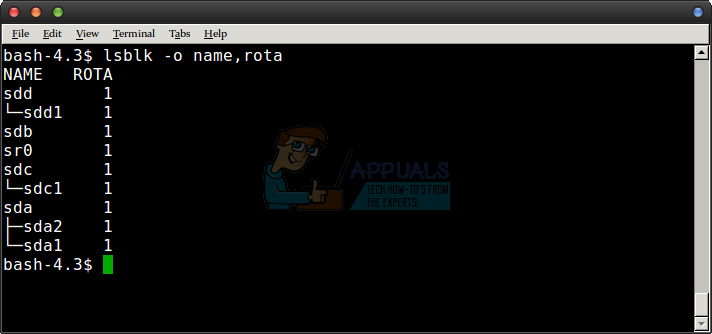
It’s also possibly another kind of rotational device. For example if the device name sr0 came up, then that was actually more than likely an attached optical drive. Partitions cut on rotational drives will also show up as rotational. So if you had a device called sda that featured the number 1 followed by sda2 and sda1 also having a value of 1, then you can be sure these are all on the same rotational disk. Any volume followed by a number 0 will instead be on a solid-state drive. This makes sense, since solid-state drives don’t spin, and therefore they’re never classed as rotational.
While this works for standard fixed drives you have attached to a machine, you may notice something funny going on when it comes time to look at external disks. This command usually features the correct information for external HDD and SSD volumes you attach via USB or IEEE 1394 ports, but you’ll often see that USB memory sticks are marked as being rotational. Stranger still, if you’re on an ultra-book running Linux that has an internal memory card reader you might notice that this is rotational as well.
Obviously, USB memory sticks and SDXC cards don’t spin around, but they do lie and present themselves as rotational disks. They often present themselves as removable ones, and if they’re formatted as a partionless disk they can even appear as floppy drives. Granted, the idea of a multi-terabyte floppy drive is laughable, but this does explain the weirdness.
Disk images that you might have mounted will appear to be genuine volumes. For instance, if you see loop0 and it reports to be a rotational HDD, then you’re just looking at a mounted ISO. It’s possibly a Debian or Ubuntu install image. You can also hypothetically mount disk images meant for a virtual machine, in which case you’d again see this sort of a message. The underyling file system won’t matter at all, by the way. You could even run this on a completely raw drive.
Method 2: Check HDD or SSD Status Using the /sys Directory
If you know the device name that you’re looking for, then you could look directly at information that Linux collects about it. Type cat /sys/block/sdb/queue/rotational and push the enter key. You could replace sdb with whatever device name you had wanted to look at.
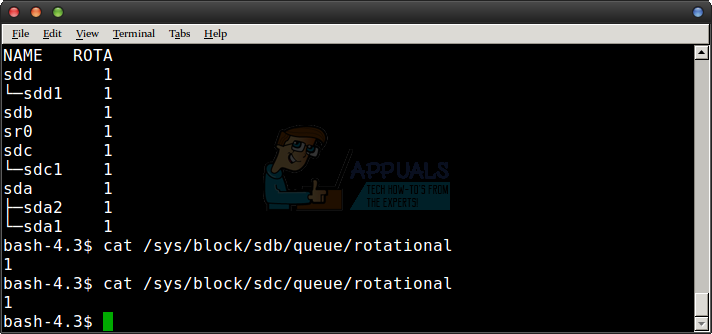
This is an excellent way to check if you’re only interested in a single volume. Once again, a value of 0 indicates the presence of SSD technology while a value of 1 indicates a rotational drive. Both of these commands are extremely easy to use, require no real playing around and don’t require you to have any sort of administrative privileges to run. They’re just the thing if you’re constantly adding and removing volumes from a particular installation.